


Balayage, what is it?
This balayage educational session was a live session with Q&A from our FSE Community. Brian will be featured on our channel weekly at 10am Est, check it out if you would like to be more interactive with our sessions.
Why read FSE blogs?
These blogs are perfect material for educational breakdowns of our content, leaving you in-the-know whilst reading along practicing yourselves.
Balayage, what is it?
Balayage is a French word translated as ‘sweeping’.
In hair terms, this is now used to name a hair coloring technique with a sweeping motion. It’s a free hand painted technique that creates soft hi-lights and natural looking lightness through hair.
So, what's ombre??
Ombre translated from French to English is ‘shadow’.
In hair terms, this is also a hair coloring technique. Ombre hair is a melted transition hair coloring technique. Often, playing with tones from dark to light. This also crosses into our balayage techniques, as you will see in the images.
Why would my guests want balayage?
The beauty of balayage is versatility, low maintenance and effortless natural looking color. It requires as much commitment as the client desires on return and these looks get more and more beautiful over time – Melty goodness!
Balayage 101 – let's get started, tools/products needed.
- Bowl and balayage brush
- Clay based lightener + chosen developer (we used Paul Mitchell skylights + 40vol)
- Coloring paddle
- clips
The Two balayage techniques.
This image below shows how the two techniques were working with effect the overall look.
The left side is a look created with a balayage version of our classic hi-lights technique. It has flowing vertical bands from root to points. The right side of the mannequin uses more of a ‘V’ shaped technique, working a more gentle ombre effect.


Clay based lighteners
Clay based lighteners are the perfect product for balayage
Once applied, the clay-based lightener hardens on the outside. This creates a little environment on the inside to keep the lightener moist. As we know once the lightener has dried, it slows on processing. The environment is keeping the lightener doing its job, whilst protecting the ‘non colored sections’ from transfer or ‘bleeds’ that we get with classic lighteners.
To work with balayage, consistency is important. A good, thick, consistency that we get from clay lighteners, will give us control with our application.

A few pointers for balayage.
- Work on the part that the guest walks in with. If we start moving the guests part, the color won’t compliment the look as nicely, when they style their own hair.
- The majority of Brians balayage's are created with 40vol. This is because balayage is much gentler than classic foil hi-lights. We don’t have the benefit of foil incubation, which accelerates our process.
- Consider your guests desired cut. A balayage on long layered hair is painted completely differently to a balayage on a 1 length bob. You may need to cut PRIOR to your color application.
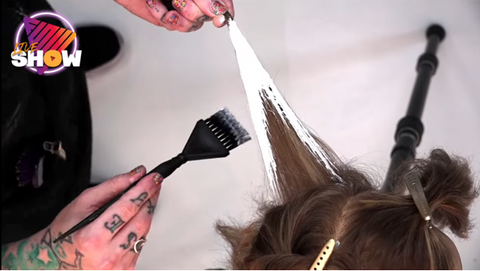
Technique for painting
This technique also applies to our ‘V’ technique written about later in the blog. We just change our sections and placement.
1-Apply lightener to the paddle.
2-Think about the density of the section we pick up. We don’t want spots or sections that are too fine.
3-The technique requires us to pull the hair out from the head at 90 degrees, pinching hair further down the section. It needs more density than a classic hi-light.
4-Pile up a little ‘dome’ of lighter on the brush.

5-Start a couple of inches from scalp and sweep towards you.
6-Work up and tailor you're painting at the roots to your desired result. Getting as close to the head as you please.
TIP- Take away any blobs that fall stray from your painting, just removing them will stop them areas from lightening. Avoiding unwanted spots in the hair.
7-Work your way down the section, utilizing your paddle for lightening ends.
8-For extra lightness on the ends, use the brush to spread the hair and work extra lightener in using your creativity to visualize the look you desire.

9-Elevate each section 90 degrees away from the scalp, once painted, use the tip of your tint brush under the section and pull away the paddle. This leaves a small ‘buckle’ at the root creating space between the painted piece and the hair lying underneath. This helps avoid transfer of product.

10-Hair sections are picked up more naturally than typical weaving techniques.
TIP- When we do our hair sweeping effect, we want the hair to take the product off the brush. Don’t smash lightener in through the hair, let it gently rest on the top of the painted section.
Saturation, how does this effect my balayage?
Pressing product into the hair until the hair is visible through the product will create less lift. This is because we are spreading the product thinner.
The lightener that looks like a cake frosting will get a higher lift.

So, we can work the product into the hair more, but this is going to give us a more subtle effect. So, think about where you need that effect.
On your sections, you could try pushing the lightener in at the roots for a more, gentle root blend and giving the mid-ends a good frosting of lightener - for a gradual light effect.

Now let's talk about our second ‘V’ technique.
So, the ‘V’ technique is our more ombre balayage. The hair is brightened more on the ends giving the blonde a natural but more obvious glow up.
1- Sections are took in a ‘V’ shape. Giving it a bit more structure and a fuller section to paint.

2- Focus on where you pinch. The pinch dictates where our ombre/lightened ends effect will live.
3- Higher pinches create more control, lower pinches create slack and bounce. This can make it particularly difficult to freehand paint.
TIP – It may be worth considering different techniques if your desired look cannot be controlled with a lower pinch. Make sure balayage is the right technique. Sometimes teasy lights, foils, wet balayage or straight up ombre on the ends may be a better option.
4- Again, let the hair take the product. Don’t force it through unless the desired look is with less lift.
5- Highlight the outer edges of your ‘V’ shaped sections and let the ‘V’ meet.
6- Before working on the ends make sure your happy with your placement.
7- On the paddle, lightly spread the ends without pulling apart the painted ‘V’. Gently work the product through and don’t skimp on saturation.

8- Check the underneath by picking up the hair with the corner of the paddle to make sure it has the desired result.

9- Pull the lightener over the ends using the brush and paddle, and you should have a balayage ‘V’ section like the image below!

And finally.
- We haven't experienced damage from over processing. If anything, we find it is better to leave our product on a little longer with our technique being gentle.
- On both our ‘V’ technique and our ‘streak’ technique you can combine the heavy frosting and the pressing product.
- The two techniques can both be used on one application.
- Visualize and be artistic with your placement.
- Remember, you may need to cut the hair prior.
- Catch Brians educational class on our Free Salon Education channel live on Wednesdays at 10am est.
- Most importantly, have fun!!!
Check out our youtube channel Free Salon Education for the video to this blog.


LATEST VIDEOS

How To Fix Thick Heavy Hair

Best Curly and Wavy Haircut for a Round Face

Full Step By Step A-Line Bob

Monday Academy: The Modern Farrah Fawcett

No More Dog Ears When Cutting a Bob Haircut

Comments
Donna said:
Love all the videos, so helpful
But can you show how you do the front and the money piece? This is where I struggle most.
Leonie Hughes said:
Hi there thank you for this free education . You have explained the Balayale steps so easily to understand. Thanks.