


Favorite Haircut For Curly Hair
Check this blog for a cool little how-to cut curls working with curl texture 4a/4c.
Below the video attached is from our YouTube channel FreeSalonEducation. We have an abundance of educational content for you and your team. Hot on the trends, build knowledge and become a kick-ass hairdresser ready to take on any guest that sits in your chair! - So let's get cutting that curly hair.
Get Prepared! - Tools needed to cut the curly hair.
- Clips
- A curly doll/model
- Scissors
Pretty simple right?
Let's prep them curls!
Sectioning off the curly hair cut.
Assess the hair and scrunch to see the shape you want to achieve.
Sectioning this hair type is a little different to straighter hair. We don’t want to disturb the curl pattern, and need to work with them. We want a 'U' shaped part temple to temple that comes across the occipital at the back.
The sectioning is took with the fingers only! No precision lines here (which can feel a little un-natural for us precision cutters) We need to take the section without pulling apart the curls. So, using our hands to section, try to keep it as neat and balanced as possible without the disruption of where the curl lives.
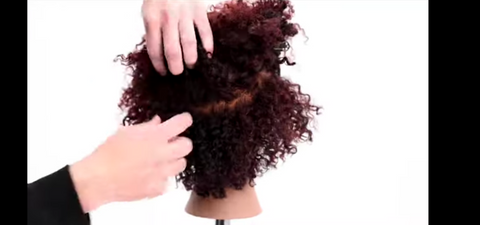
The hair cut sectioning is taken in three basic levels- Bottom, mid-section and top. You will see as you continue to read through the blog.
Let's get cutting some curls!
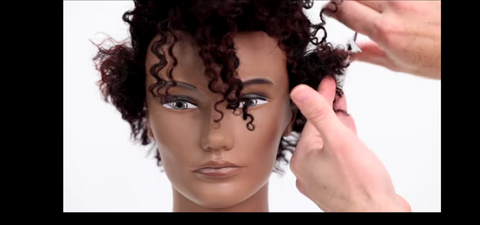
Again, with this texture we need to work in a way that isn't disturbing those curls.
The cutting sections are taken vertically, and instead of the way we traditionally use combs on straight hair, were working with just our fingers and were not pulling at the curls but cutting them where they live. This is to avoid bounce back!

TIP- Curls like this cut with too much tension will spring back, sometimes looking shorter than planned or uneven in shape – OUCH. Low tension will help avoid any unplanned 'accidents'
Cutting Curl angles
Cutting the angle really does depend on your artistic interpretation.
We cut the curls with scissors on a 45° angle. We're building shape and width towards our mid-section. Our guide is pulled over to our new section and cut to the round of the head. We don’t want to over-direct on this cut and push weight forwards. Once our whole section is cut, check over with the scissors for strays.
Section 2 of our Curly Cut
Again, we are using just our hands to separate this hair.
The sectioning for the mid-area is taken across the parietal ridges and around the crown. You need to question what you are looking to create. Weight? A lighter layer? Matt likes to work vertically to create a lighter layer. He wants less bulk but it can be adjusted to suit your vision.

And I repeat – Less tension helps keep control on the look. Cut it where it lives.
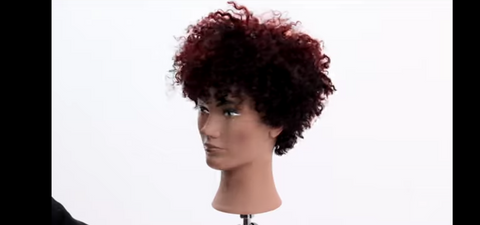
Bring on the Curly top section!
Let it down and just take a look at the shape and form.
Matt loves how it looks already! So, he is tweaking the curls to fit his vision. He picks out individual curls and he cuts them from the inside. This little technique reduces frizzy ends. Gradually building the look.

And finally – Fine tuning.
Matt mists the hair with Paul Mitchells Invisible Wear Boomerang Restyling Mist. The name says it all, a lightweight curl reviver to reactivate it back into form. Fine-tune with scissors for extra dimension and shape.

Finish with Paul Mitchell Awapuhi Wild Ginger Finishing Spray to hold the look in position! Hope you enjoyed this tutorial. Let us know what you think – drop a comment below! Subscribe to our channel or download our FSE NOW app for more education!
Happy cutting!


LATEST VIDEOS

How To Fix Thick Heavy Hair

Best Curly and Wavy Haircut for a Round Face

Full Step By Step A-Line Bob

Monday Academy: The Modern Farrah Fawcett

No More Dog Ears When Cutting a Bob Haircut

Comments
cathy wikoff said:
I have curly hair and i think you did an awesome job on the manequin