


How To Cut an Italian Bob Haircut
Looking to cut an Italian bob? Want to create Italian bobs on your guests in the salon? Do you love keeping up to date with the latest haircut trends? Take a look at this Italian bob haircut tutorial.
We've seen hair cutting trends over the last couple of years based around chic European hairstyling. We love the elegance and demure of an Italian bob haircut. At free salon education, Matt creates video content on all social platforms for you to keep educated on the latest haircuts for free. So, you as a stylist can create the most beautiful haircuts and styles on your guests. Check out the video below for a visual on the cutting techniques. Paired with this blog you can go through this look step by step in the salon.... happy cutting!
Step 1 – Sectioning The Hair For an Italian Bob
Matt begins with using his knowledge from the FSE digital haircutting system. This system teaches you the basics, allowing you to re-create any hair cut in the salon. Based around 8 haircuts, you'll learn body positioning, cutting techniques and terminology. Matt uses a sectioning comb to part the hair. Following the bridge of the nose, back to the crown.

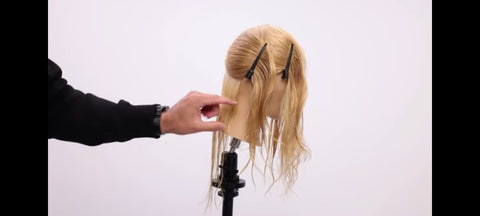
Step 2 – Cutting an Italian Bob, Split the Sides of the Hair.
So, Matt talks about why splitting densities of the hair can not only help you handle a haircut, it can also avoid common hairdressing mistakes. Look at the picture, The back is one large section. The sides are two smaller sections. The back of the sectioning is then split down the center, and we work beneath the occipital bone on a slight diagonal forward. Matt then decides to work on cutting his guideline in the back.
Step 3 – Start Cutting the Italian Bob
So, sectioning aside, let's do what we came to do - cut. Comb the hair down at 0 elevation. Matt points out he is choosing a longer length because his mannequin has a long neck. Also, longer bobs can be a versatile cut so check out what your guest wants in consultation. Matts parting follows the jawline. Cut in your guideline, by using the comb at 0 elevation with 0 tension. You begin in the middle back, this helps balance your guide line, so you don't end up with a wonky cutting line. Then club cut your basic line in.

Step 4 – Italian Bob Hair Cutting Tips
Check your body positioning! Are your feet in line with your shoulders while cutting hair? Are you squatting to keep your eye on the guide? Your eye wants to be level with the section you're working on. Combing and cutting at 0 elevation can be controlled better by using your comb to hold the hair onto the neck. Sometimes cutting hair without using the comb can cause your hair to build up and run along the scissor blade, creating inconsistent cutting lines.

Step 5 – Continue Cutting the Italian Bob With Method in Mind.
Once you've assessed your cutting tips, think about the method. You have your guide, now you need to follow the guide. Follow the sectioning pattern up the back of the head, cut with zero tension. Matt explains he actually likes to cut a little below his guide. This allows the hair to curve under the guide. Adding a bevel round edge on the Italian bob. Also, when creating new sections, Matt is taking around 1'' sections. The most important thing to note with 1inch sections, is that you can see through the section to your guide.

Step 6 – Cut the Sides of the Italian Bob Haircut
So, we are continuing the sectioning method of using the jawline of your guest as your guide. Comb the hair down and ''tap'' with the scissor above the ear. We do the ''tap'' to ensure the hair has a little release of tension. Avoiding a shorter line where the hair sits on the ear once dried and styled. Continuing with 0 elevation and following the sectioning and cutting techniques until you have run out of hair. Continue the same cutting techniques on the opposite side, checking for balance in the cut.


Step 7 – Products for Styling your Italian Bob Haircut
So, your haircuts successfully complete, now let's bring this look to life! An Italian bob is an effortless composed look so were working with a blow-dry only in the hair styling. Grab your Heat protective styling products. We use Paul Mitchell Clean Beauty Heat Styling Spray and Neuro Style Prime. This cocktail gives us shine, control and double heat protection.

Step 8 – How To Blow Dry an Italian Bob Haircut
Firstly, the hair needs to lose some moisture, Matt like to remove some until it's 75/80% dry. This helps with control of the hair, and increases volume in the style. Airdry the hair with the blow-dryer aiming down the hair. Then, attach your nozzle, and section the top of the hair away. After, use a round brush and follow the brush with the hairdryer, turning the brush and blow-drying downwards.

Step 9 – Round Brush Tips for Italian Bob Hair Styling
Matt shows a nice tip around the front section of the haircut to blow-dry off the face. Get mid-lengths to ends of hair in the round brush, heat them up, let them cool while hitting the root of the hair with heat and tension. Then hit them with a cool shot of air. This breaks bonds in the hair and re-sets them giving volume and styling the hair with a nice kick-back.

Step 10 – Texture up the Italian Bob Cut
Add some fun movement with your styling products. We're using Paul Mitchell Invisible Wear. This is not like a classic texture spray it comes out in bursts and doesn't give a tacky effect in the hair. Then we're done! The Italian bob haircut is a beautiful versatile look, and can be worn in different ways/styles. So, encourage your guest to play.

If you loved this Italian bob haircutting tutorial, check out Free Salon Educations social media platforms on TikTok, YouTube and Instagram.


LATEST VIDEOS

How To Fix Thick Heavy Hair

Best Curly and Wavy Haircut for a Round Face

Full Step By Step A-Line Bob

Monday Academy: The Modern Farrah Fawcett

No More Dog Ears When Cutting a Bob Haircut
